
If you answered no, or if you feel your Facebook page isn't having any impact this post might just be the kick start you need. Over the next couple of weeks I'll show you how I set up my new Facebook page using free tools to spice up the content and persuade visitors to hang around a little longer and eventually become fans. Let's face it the internet has reduced most of us to 'browsing butterflies'. Unless we find something to immediately attract our increasingly limited attention span we flutter off to the next website.
The Vital First Step:
- Your header must have visual impact.
- It must make clear what your Page is about - what niche your books are in. It's vital you identify your niche in order to effectively target the reading audience you want to reach.
- If possible include a brand logo of some kind.
To create a visually striking header I used three 'tools':
You can join for free. It's great fun and has enormous potential for authors. I have a GoPlus account which at $6 per month is great value. GoAnimate simplifies the process of creating animations making it is easy to create your own characters. My header picture features characters from two distinct groups of play scripts for children. One set of characters was created for the Chronicles of Bumblebania, a series of plays about an imaginary dysfunctional royal family. The other characters were Sherlock Ohms and Dr Watts-On who appear in the Science Drama series under the title Sherlock Ohms and the Mystery of Magnet Manor. They were all created using GoAnimate and are unique to me.
GoAnimate has multiple uses for promoting your books and you as an author. We'll take a look at other potential uses in later posts but for now let's just stick with creating the header. Once you open a free GoAnimate account you will find yourself on a page with this button:


The characters that appear above are those I have already created in Comedy World and are now available in My Library.GoAnimate has multiple uses for promoting your books and you as an author. We'll take a look at other potential uses in later posts but for now let's just stick with creating the header. Once you open a free GoAnimate account you will find yourself on a page with this button:
Click on it. This page will appear:
Various options appear for making a video.
Try them out at your leisure.
Most of my videos have been made in Comedy World. When you hover over the Comedy World image a Make a Video button will appear. The first time you click it this option will appear:
It's worth taking time to get to know the features available to you.
After watching the tutorial or if you decide to skip you will be taken to the videomaker screen.
On the left hand side are a selection of background images. Scroll down and see if any are suitable. Once you have chosen a background simply click on it and it will replace the background already there.
You can also upload your own background from your computer.
There are various icons on the menu bar top left of the videomaker area. Click them to access different elements. Try clicking the orange image of a man. A selection of characters will appear:
Before I chose the characters I need to change my background. The Facebook page I am creating is to promote my Child's Play Maths program and children's play scripts. My background should project this and have visual impact. The background I choose is a screenshot of a starship created on the interactive software that supplements the math program.

Next I click on the character logo and choose two characters.

They now appear on the videomaker screen.

When you first click on one of your characters you are given a choice of what Action and Emotion you want your character to display. We can ignore the Voice feature for now as we are simply using GoAnimate as a graphic creation tool to create our Facebook page header.

I decide to make one of the characters behave in a disrespectful way to the Spock character. I also need to make this character smaller. To achieve this simply click on the character and he will be enclosed by a box above which appear a series of options. By moving the arrows on the rectangle you can resize and/or rotate your character. The options above allow you to flip left or right, move him to the background or foreground or delete him altogether. In this case I have made him smaller so he can sit on the spaceship and provide a little perspective.
Now we need some text. Click on the text icon (T) and this menu appears:

I want to create a speech bubble for Spock so I simply click on one I like. You may have noticed that I also changed the action of the character so he is now speaking into a communication device. Double click on the bubble and you can input text with the font of your choice.

Hopefully some people will recognise the Cuisenaire Rods and most will recognise Spock. This still does not explain what my page/book is about. Some people may think it is to do with Science Fiction. When we consider how to reach our target market through Facebook in later posts it is important we are clear just who we are aiming to reach. In this case it may or may not be Trekkies but it is definitely parents and educators interested in making math a fun experience for their children.
I think I need to add more text!
This time I click on one of the fonts. A text box will appear on screen.

Type in the text. From the menu on the left hand side you can choose various options:

Play around with the settings until you are satisfied you have the right Font Size, Style, Color and Background.
My screen now looks like this:

It should now be pretty clear what the page or book is all about.
So how do we transform our GoAnimate scene into a graphic image?
We use a free screen capture software called Screenhunter,
You can download it here.
Once you have downloaded your Screenhunter software a desktop link should be created that looks like this:
I think it might be easier to watch this brief video:
There is one final step. Facebook page headers have to be uploaded with a minimum size of 720 pixels wide. However, the optimum size is 851 x 315. Don't panic because there is a super free online tool that will resize your picture for you. Introducing SuperResizeMe - click on the link to visit the website. You will reach this page:

Click Select image.

Navigate to the image on your computer. Select it and click Open.
The image you have chosen will now appear in the box.

Now scroll down the sizes and select 851 x 315.
Make sure you select the Stretch/Squeeze button as you do not want to crop your image, simply resize it.
You must remember to click the blue Add to list button. When you do your selection will appear in another blue button on the right. It says: 851 x 315, stretch, Same.

If you want to change the format of your image then you must click and open the menu directly below Stretch/Squeeze.
This list will appear:

I usually choose jpg or png. Png is probably best for computer based images.
Now you can click the blue Add to list button.

PNG will now replace the word Same.
Once you are satisfied you have chosen all the right options and added them to the list you proceed to Step 3:
Simply fill in the correct answer in the box and press Return.
If you answer correctly the text in the blue button will change to Uploading Image.

Once the process has been completed this will appear on your screen:
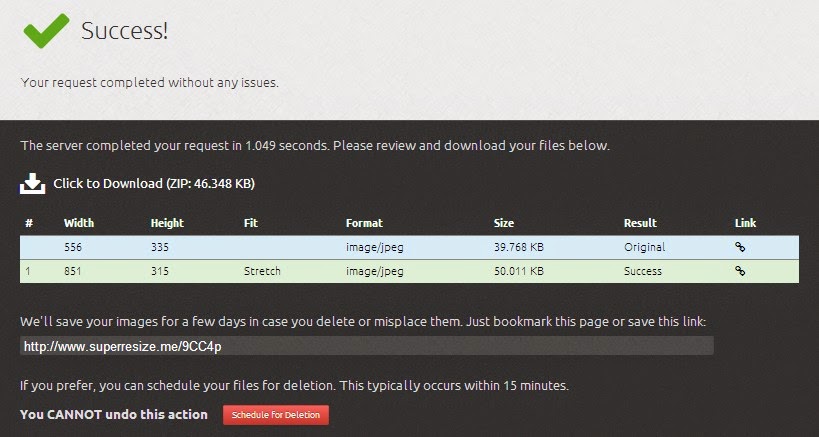
To access your image click on the Success Link.

SuperResizeMe can also be used to create the small profile inset picture in the header. You may have a logo or simply want to include a photo of yourself. The dimensions are 180 x 180 and the process is exactly the same except you choose 180 x 180 not 851 x 315 - duh!
When I eventually launch my Facebook page, Help Your Child Succeed, at the end of August I shall be giving away copies of the software featured in the page header. Although it does not directly relate to you as an author if you have children or nephews or friends with children please let them know. Children love using it and it is a completely stand alone app although it was created to supplement Child's Play Maths.
Next week we look at setting up Tabs for your Facebook page using Static HTML. It may sound 'too techie' but it's not really. There are lots of cool ways you can utilise these tabs to promote yourself and your book.
ayo buruan coba klik DISINI banyak yang menarik loh
ReplyDelete